Hosting this blog in S3 with CloudFront and Route 53
Posted on Fri 03 January 2020 in aws
I chose Pelican for setting up my site purely because of my bias towards Python, this post is not about that decision but on how I use AWS services to host it. So here goes:
Setting up S3
Create a S3 bucket named the same as your website url (exclude the protocol) eg. the bucket for https://my-pelican-blog.com will be named my-pelican-blog.com. I create another that covers the www subdomain too eg. www.my-pelican-blog.com. You will only use one of these to house your blog content, the other will just forward all requests to the other.
Let’s set up the forwarding one first, I use the www subdomain bucket as the forwarding one. From the S3 space in the AWS Console select Create bucket, you will be prompted with a dialog like this:
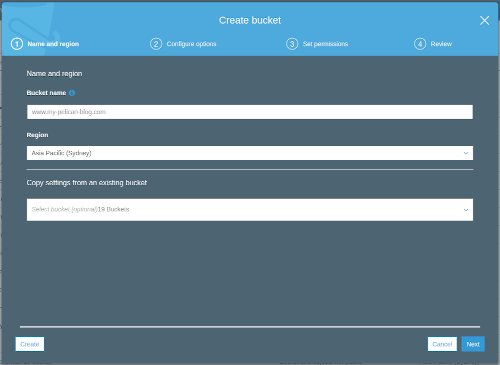
Keep all the default settings, we don't need anything to be public just click Create. Once created go to your bucket properties and enable Static website hosting:
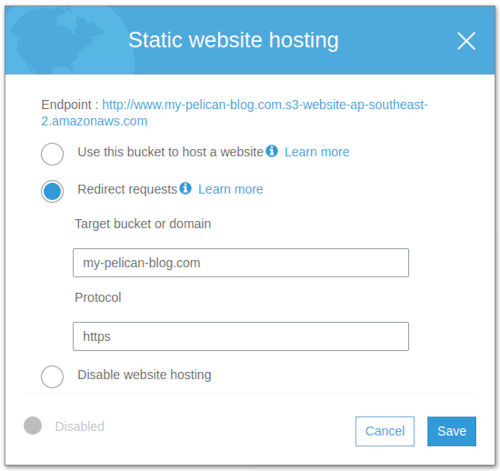
Copy the endpoint provided at the top of the Static website hosting modal and keep it somewhere. We will need it later when we create the CloudFront distributions.
Create the other bucket for the naked domain, use the same settings as the first one for now, we will change them once we have CloudFront set up. This bucket will be the one hosting the site.
Sync the contents of your Pelican output folder with this second bucket. There are many ways to do this but the easiest for now would be to use the built in Pelican functionality make s3_upload, that is if you added the bucket name either during your bootstrapping process or later in the config. I will in a follow up post, share how I automated the deploy of my blog using Bitbucket pipelines.
Don't be alarmed if you get a 403 Forbidden page when you visit the url supplied in the Static website hosting setup:

This is ok, we have not made anything public and we don't want to. We will be giving CloudFront the ability to access our content and serve it up to our visitors.
Securing your site with AWS issued certificates
AWS Certificate Manager gives you free public SSL certificates so use them. A secure site is always more attractive than one that is not. Access the Certificate Manager from the console and create/request a certificate for your blog.
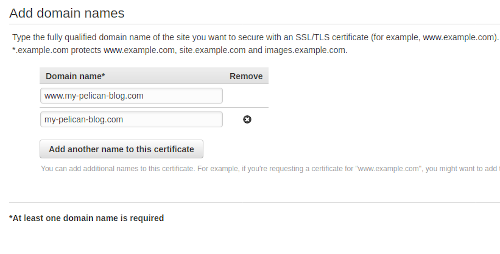
Select Request a certificate on the landing page, then make sure Request a public certificate is selected and click Request a certificate. Add your domain names, www.my-pelican-blog.com and my-pelican-blog.com:
Select the validation method, I have only used DNS validation in the past as I have access to modify any DNS configuration for the domains I own. To do this, export the DNS configuration file and import the configuration into your domain's DNS config, it will take a while to validate.
Setting up CloudFront
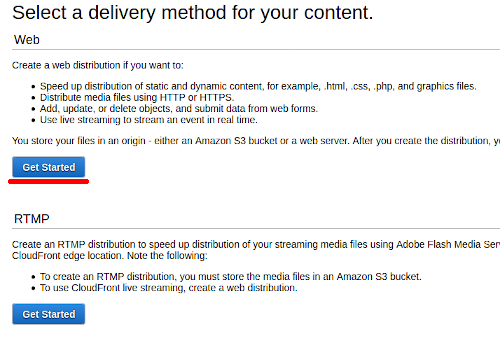
You will need a distribution per bucket, let's create the main one first. Navigate to CloudFront in the AWS Console, click Create Distribution and select a Web distribution.
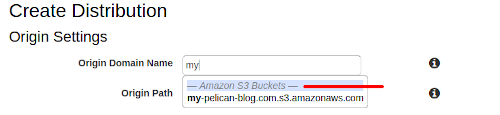
Make sure you select your bucket name (my-pelican-blog.com in this case) in the options supplied under Amazon S3 Buckets:
Set the following options under Origin Settings:
- Restrict Bucket Access to Yes
- Origin Access Identity to Create a New Identity
- Grant Read Permissions on Bucket to Yes, Update Bucket Policy
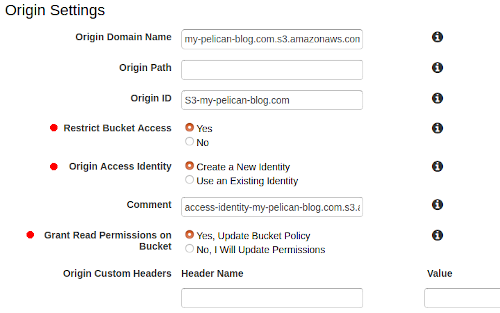
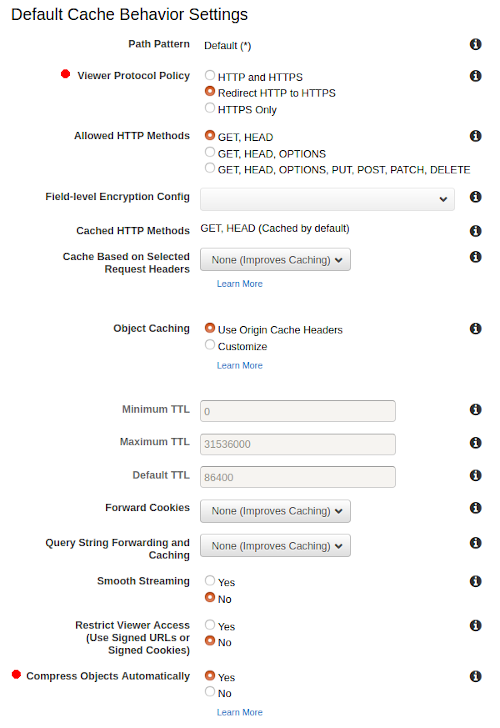
As the above states it will assist us in only allowing read access to the bucket via CloudFront. The next section is Default Cache Behavior Settings. The only options I change here are:
- Viewer Protocol Policy to Redirect HTTP to HTTPS
- Compress Objects Automatically to Yes
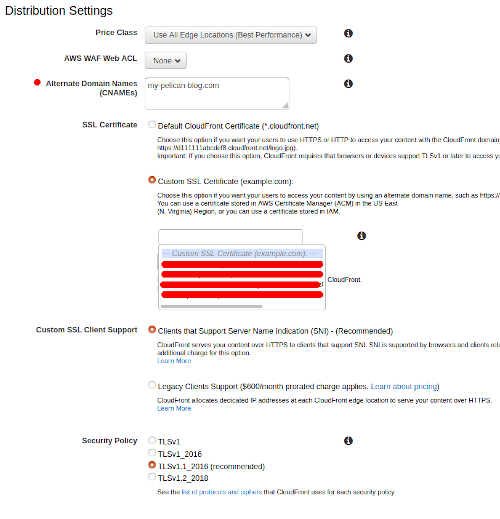
The next section is Distribution Settings and all I add here is the certificate information and alternate domain names. Your certificates created in the above section should show up here once they have been validated:
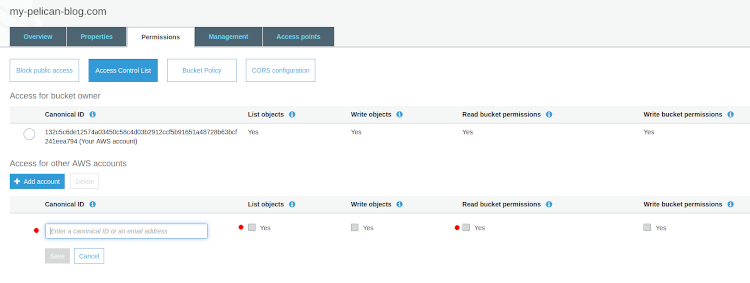
Make sure Distribution State at the bottom is set to Enabled and click Create Distribution. This does take some time to finish, while you wait for the distribution to be created head over to the Origin access identity under the Security section in CloudFront. Get the Amazon S3 Canonical User ID of the identity that you created during the distribution creation. We are going to add this to your S3 buckets as this is the key to grant your distribution access to your bucket contents.
Add this to both the buckets. From the S3 console access select your bucket(s) and navigate to the Access Control List. Add the Amazon S3 Canonical User ID to the Canonical ID field and only select the List objects and Read bucket permissions options:
This should grant your new distribution access to your bucket, to test it head back to CloudFront. In you list of distributions there is a Domain Name column, copy the domain name of the distribution we just created, paste it into your browser's address bar and press enter. If all goes well, you should now see your newly created blog.
The distribution for the www.my-pelican-blog.com bucket is a copy of the one just created, the only differences are:
- In Origin Settings paste the static website hosting endpoint copied earlier into Origin Domain Name
- The origin access identity options will now be hidden.
- In Distribution Settings add the www... alternate domain name instead.
Once this distribution is created and it's domain visited it should redirect you to your blog.
R53 changes
I am not going into how to migrate your domain to R53 or procuring you domain name through R53, this will just cover how to get your CloudFront distributions working with you already registered/set up domain in R53.
All that is left to do is to update your DNS settings to make use of your newly created CloudFront distributions. Each distribution created will have it's own domain name and R53 makes it super easy to match it up to your domain.
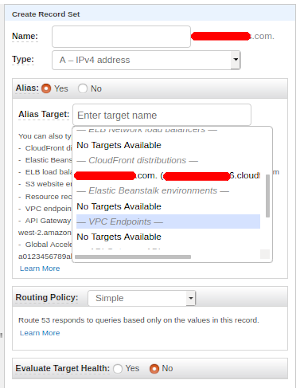
Navigate over to R53 and access your domain's Hosted zone. Here we are going to create four new records, two A (IPv4) and two AAAA (IPv6) records. Select Create Record Set and don't add anything additional in the Name option, we are creating the naked domain A record first. Select Type as A - IPv4 address and set Alias to Yes. Once you select Alias Target you will be presented with some options, scroll down until you find CloudFront distributions and select your distribution. AWS already filters out the ones that don't match your domain. Leave all the other options as is and click create.
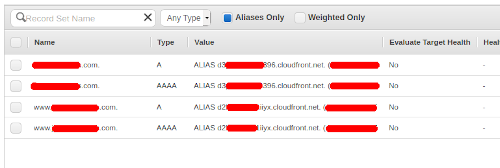
Create three more record sets:
- Leave Name blank for naked domain but select AAAA - IPv6 address and select the CloudFront distribution.
- Add www to the Name option, select A - IPv4 address and select the CloudFront distribution
- Add www to the Name option, select A - IPv6 address and select the CloudFront distribution
You should have 4 alias records now:
Now I have not timed how long these take to propagate but give it at least 20 minutes and then when you visit your site either via the naked domain or www subdomain, you should now see it in all it's glory.
I welcome any feedback even if it is about my use of grammar, all of it helps me learn and improve. My next post will be how I used Bitbucket pipelines to automate the deploy of my blog.