Automate the deploy of my blog using Bitbucket Pipelines
Posted on Sun 12 January 2020 in ci/cd
Bitbucket is my cloud version control platform of choice for all my private personal projects. I chose it due to being exposed to it daily at work and their free plan provides more than enough useful features for my needs.
AWS Permissions
To make this work you need to grant the Bitbucket pipeline access to your AWS resources. I chose the route of least privilege and created an AWS IAM user that will only have access to my blog's resources and only what is required and nothing more.
First create a policy that will be linked to this user. After signing into your AWS account navigate to IAM, select Policies from the left-hand menu and click Create policy. From here go straight to the JSON tab, I find it easier manipulating policies here than trying to use the GUI. Copy and paste the below JSON into your space and replace the S3 bucket and CloudFront details:
{
    "Version": "2012-10-17",
    "Statement": [
        {
            "Sid": "S3BucketPolicy",
            "Effect": "Allow",
            "Action": [
                "s3:ListBucket",
                "s3:PutObject"
            ],
            "Resource": [
                "arn:aws:s3:::my-pelican-blog.com",
                "arn:aws:s3:::my-pelican-blog.com/*"
            ]
        },
        {
            "Sid": "CloudfrontPolicy",
            "Effect": "Allow",
            "Action": "cloudfront:CreateInvalidation",
            "Resource": [
                "arn:aws:cloudfront::000000000000:distribution/XX11XX22XX33XX",
                "arn:aws:cloudfront::000000000000:distribution/YY11YY22YY33YY"
            ]
        }
    ]
}
Replace my-pelican-blog.com with the name of the bucket where your site is hosted from in the S3BucketPolicy. Also replace the two dummy arns with the arns of your CloudFront distributions associated to your website in the CloudfrontPolicy.
This policy will now allow any IAM Role or IAM User it is attached to, to ONLY:
- List (s3:ListBucket) only the contents of your blog's bucket
- Upload/Add/Overwrite (s3:PutObject) items of your blog's bucket only
- Invalidate (cloudfront:CreateInvalidation) the cache of the CloudFront distributions fronting your blog
Try as it might this user or role that will have this policy will not be able to do anything else in your account, granted it does not have any other policies linked or belong to groups with more privileges.
You could create a more relaxed policy that will allow the mentioned actions on any S3 bucket and/or grants the privilege to invalidate any CloudFront distribution but, my personal preference is to make the blast radius as small as I can.
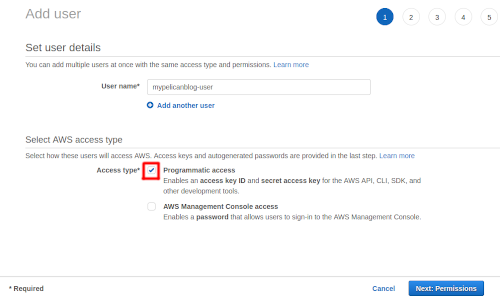
Now that you have a policy you need a user that can use it. Navigate to the Users menu and select Add user, give the user a name (something that will allow you to easily associate it to your blog) eg. mypelicanblog-user select Programmatic access (we don't want this user to sign in via the console) and click Next: Permissions.
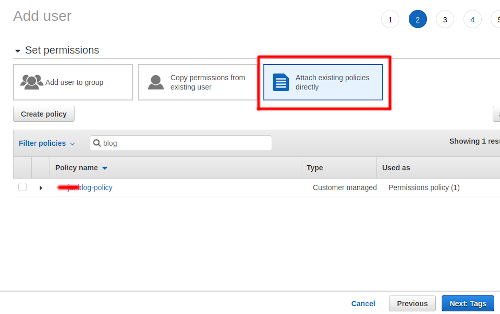
On this page you link the policy you created previously, select the option Attach existing policies directly and search for your policy, select it and hit next.
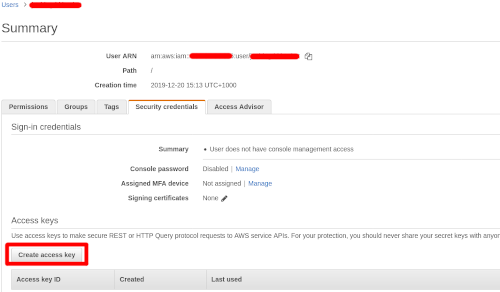
The next page is for tags, here you can add some if you need additional information linked to your user, hit next to review your user. If you are happy with the details hit Create user. Now navigate to the user details and access the Security credentials tab, from here you are going to create an access key that will be used by the Bitbucket pipeline to authenticate as the blog user.
Download the csv you are presented with, you will use these details in the next session where we are going to set up the Bitbucket pipeline.
Bitbucket pipeline
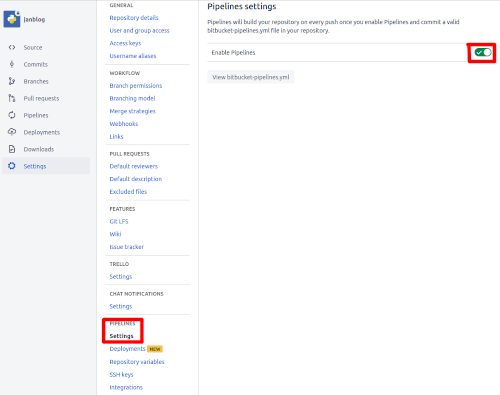
Navigate to your repo in Bitbucket and access it's settings, from here go to PIPELINES and it's settings and enable pipelines.
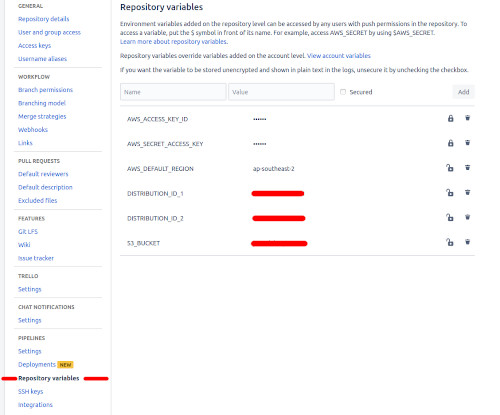
Next we need to add the user's access key id and secret access key to the repo's Repository variables, the region your blog is set up in, distribution ids and the S3 bucket the source needs to be pushed to. I added both the access key id and secret access key as Secured values, this ensures that they can't be viewed or retrieved once entered.
All that is still needed now is to add the bitbucket-pipelines.yml to your repo, set it up to always push the master branch to the S3 bucket and then invalidate the CloudFront cache too on each merge to master, make sure it is in the root folder of your repo. Bitbucket makes this easy for us by supplying scripts that will handle the S3 deploy as well as the CloudFront invalidation. This is what my file looks like:
image: python:3.6
pipelines:
branches:
    master:
    - step:
        caches:
            - pip
        script:
            - pip install -r requirements.txt
            - make clean
            - make publish
            - pipe: atlassian/aws-s3-deploy:0.3.8
            variables:
                AWS_ACCESS_KEY_ID: $AWS_ACCESS_KEY_ID
                AWS_SECRET_ACCESS_KEY: $AWS_SECRET_ACCESS_KEY
                AWS_DEFAULT_REGION: $AWS_DEFAULT_REGION
                S3_BUCKET: $S3_BUCKET
                LOCAL_PATH: 'output'
            - pipe: atlassian/aws-cloudfront-invalidate:0.1.1
            variables:
                AWS_ACCESS_KEY_ID: $AWS_ACCESS_KEY_ID
                AWS_SECRET_ACCESS_KEY: $AWS_SECRET_ACCESS_KEY
                AWS_DEFAULT_REGION: $AWS_DEFAULT_REGION
                DISTRIBUTION_ID: $DISTRIBUTION_ID_1
            - pipe: atlassian/aws-cloudfront-invalidate:0.1.1
            variables:
                AWS_ACCESS_KEY_ID: $AWS_ACCESS_KEY_ID
                AWS_SECRET_ACCESS_KEY: $AWS_SECRET_ACCESS_KEY
                AWS_DEFAULT_REGION: $AWS_DEFAULT_REGION
                DISTRIBUTION_ID: $DISTRIBUTION_ID_2
And we're done, you now have an automated CI/CD pipeline for your blog. It makes life so much easier to not have to remember all the manual steps required AND DevOps sure beats ClickOps!